words Alexa Wang
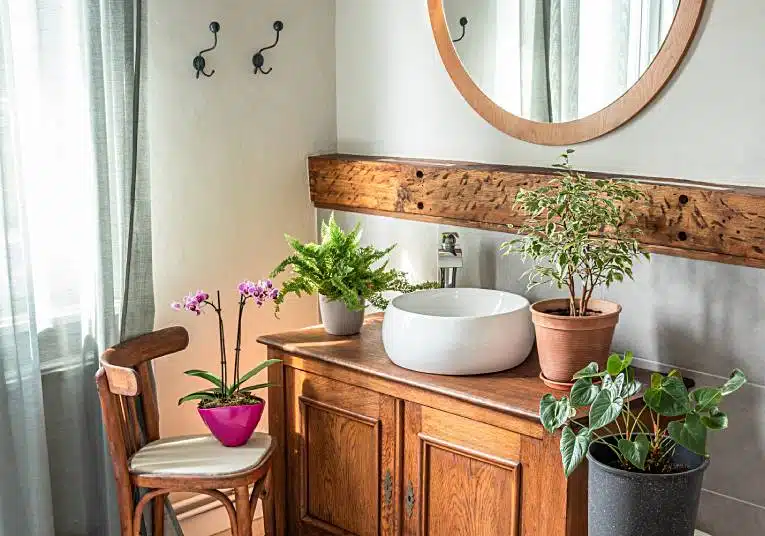
Nothing looks classier than vintage furniture preserved perfectly. However, that isn’t the case for most antique pieces. As much as you’d love to cherish their classic beauty, they can’t last forever. So instead of putting them out on the street or selling them for scrap, why not bring that vintage charm into your bathroom by turning them into modern with a modern DIY bathroom vanity?
If you’re planning to remodel your bathroom and want to save on costs, repurposing your old vintage furniture as a freestanding vanity unit with a basin will get the job done. Moreover, these pre-loved pieces look more stunning than most contemporary units, especially if you love a classy interior.
In this guide, we’ll walk you through seven easy steps to transform your old bathroom furniture into a stunning freestanding vanity unit.
Step 1: Choose the Right Furniture Base
It may not be possible to turn every cabinet into a vanity unit. Therefore, you should know what can be the best fit for this purpose. Moreover, you should also look for materials that can withstand a humid environment. The best material for such a purpose can be engineered wood as it is cheap and easily available. Anyway, there are ways to make your furniture unit water-resistant as well.
Since vanity units have a countertop with a fixed basin unit, you’d need something that closely relates to it. Perhaps any wooden table or chest drawer with at least 40 cm of countertop width would work. You also need to make sure the furniture is constructed out of hardwood sturdy enough to bear the weight of the basin bowl on top.
Similarly, do consider the height of the furniture as well. You wouldn’t want to lean over the basin every time you have to use it. Something between 80 cm to 95 cm would suit most individual heights.
While you are at it, do figure out whether you’d need any storage or not. And if so, how much storage space would be ample? The answer should be based on the type of bathroom and the number of people who’ll be using it. In case having sufficient storage and space is important, a chest drawer is the most appropriate furniture piece you can use. Alternatively, you may consider bathroom vanity units from Royal Bathrooms are specifically designed to provide ample storage for bathroom essentials.
Step 2: Prep & Disassemble
Once you have selected the furniture base, you can start preparing and disassembling the vanity unit for transformation.
- Remove all doors, drawer fronts, knobs and hinges, label them with painter’s tape so they go back exactly where they belong.
- Clean every surface with a mild detergent or no-rinse cleaner to strip away grease and grime.
- Fill any existing holes or wood defects with wood filler; let it dry completely.
- Sand the entire piece, starting with 120-grit and finishing with 220-grit sandpaper. This roughens the surface just enough for primer and paint to grip.
Step 3: Make Precise Plumbing Cutouts
Turning your old piece of bathroom furniture will require you to have some DIY knowledge. Else, it will be hard and may sometimes be disastrous to deal with such things. So you must know how to make some cuts on the wood so you can make a way into the plumbing. If it was already used in the bathroom, then you are all saved. It may already have the plumbing where it would fit. It is a pretty simple job that you can complete quickly; however, you should get help from the internet to make it right.
If you can’t watch your favorite piece of furniture get butchered, this might be the time to back out. Let’s start with the top. Instead of severing the entire top, cut out the top according to the size of the basin bowl you intend to fit in. Secondly, make cutouts at the rear end of the furniture to connect both hot and cold taps to their respective plumbing lines.
- Trace the outline of your chosen basin bowl and the tap locations onto the countertop or tabletop.
- Drill the basin opening first, then notch the rear edge for hot and cold water lines.
- If you’re working with a chest of drawers, modify only the top drawers to allow clearance for the drainage pipe. Your drawers may end up a bit shallower, but they’ll remain functional.
Step 4: Select & Install Your Basin
While you may choose a vanity unit without a sink, to give it a complete makeover, you should go for the freestanding vanity unit with a basin. The most important thing here is to choose an appropriate sink.
The ideal way to go about with the project is to install a surface-mounted basin on top because they would not only occupy less space but would make things easier when it comes to tearing away parts.
When selecting the style of the basin, make sure the looks match the aesthetics of the furniture itself. Even though white ceramic would go along with most, you can also consider other choices like terrazzo, marble, and concrete basins, especially if you are all for the vintage look.
Step 5: Prime, Paint & Protect
The next thing after an initial setup will be painting the floor-standing vanity unit with a basin. To do it you must first start with choosing the most appropriate paint colour. Then you will need to strip off the paint that was already on it. It is possible to use a paint-removing liquid that will make your job hassle-free.
- Apply an initial primer coat.
- Follow with two coats of the new paint, allowing each to dry fully.
- Make sure you protect the surrounding areas and the worktop sink from getting paint marks during the process.
Step 6: Preserve the Timber Top
Yes, constant contact with water can take a toll on the wood. In case the furniture has a timber top, make sure it stays resistant to water. You can also cover the timber top with an Osmo Polyx-Oil or a varnish wax to make it waterproof. Even though it would eliminate the direct threat of getting damaged by water, it does not mean you should stop caring about the furniture altogether. Regular care is necessary and will ensure that it works perfectly in the long term.
Step 7: Reassemble & Style
Once you are done with painting and preserving the worktop, you can start reassembling the vanity unit that was removed at step 1.
- Reattach all doors, drawer fronts and hardware consider swapping in new knobs or pulls for a fresh look.
- Accessorize with a coordinating mirror, vintage-style taps, and ambient lighting to complete your bathroom’s transformation.
Final Thoughts
Turning your vintage bathroom storage into a custom freestanding vanity unit is a weekend-friendly project that saves money and adds character. With these seven steps from choosing the right piece to the final styling, you’ll have a one-of-a-kind vanity that looks like it came straight from a high-end showroom. Enjoy your beautiful, refreshed bathroom centerpiece!


